


- April 25, 2017
- Posted by: Abhay Das
- Category: Digital Assurance
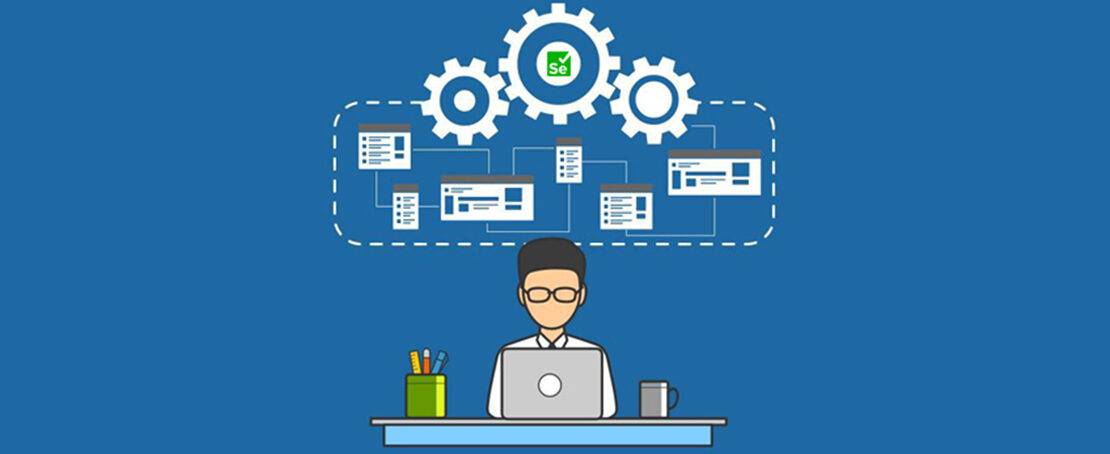
This blog post on creating and using a test automation framework is expected to help anyone with some know-how on Java and Selenium get started with the ever popular “Page Object Model” based test automation framework.
Why Test Automation?
Test automation services, as you know is to help speed up testing when it becomes monotonous and time consuming. Automation can help when we test something repeatedly. Humans are prone to making mistakes while doing monotonous actions.
Automation gets rid of monotony and repeated tasks while doing the following:
- Test the same tests with different sets of data
- Test with same set of data, on every new build, manually
- Test, find bugs, fix, regress, find bugs, fix, regress – cycle of bug fixing
Benefits of Test Automation The benefits are:
- It reduces the time to do tests, thus saving manual effort
- It runs tests parallelly, thus reducing manual effort for testing
- It runs tests with more than one browser, thus saving manual effort
- It runs more tests with different sets of data, thus getting better coverage
What is a Framework?
A framework is just a set of rules and structures, which makes it easy to get a suite of tests up and testing in minimal time. For example, assign test data in a specific folder, store configuration settings in a specific file and folder, name the tests in this template, create packages, etc.
Generally a test automation framework is built for a specific application. But frameworks can be generic as well. The examples for generic framework are:
- Linear
- Modular
- Data Driven
- Hybrid – which is a combination of all three above
A test automation framework simply helps you in developing a suite of tests, connecting with the application under test, running the tests against the “application-under-test” in required order and extracting test execution results.
Read More about Software Testing Services
What is the Page Object Model?
The Page Object Model is a design pattern of testing, derived from the Object Oriented Programming concepts. The POM describes the web application into the number of web pages being used, and contains the elements as properties, and actions as methods. This offers you low maintenance on the tests developed.
For example, for a generic log in page, you would want to,
- “set user name to a String value being passed from the test”,
- “set password to a String value passed from the test”,
- and “click on submit”
and the above two tasks are completed. To continue we would need to “validate whether home page is loaded with the set user name”.
Creating the test automation framework
We will now attempt to guide the user through the creation and designing a simple test automation framework for running tests on web applications, using Selenium webdriver, TestNG and Maven, using Java programming language. This framework should help you run the tests from an Eclipse IDE or an IntelliJ IDE.
Tools used are:
- Apache Maven – Defines the project structure
- Selenium Webdriver – Test automation tool/library
- Selenium Grid – A feature to run tests on multiple test environments on a network
- TestNG – Test runner and report engine
- Java – Language that connects all components
The test suite structure is as given below.
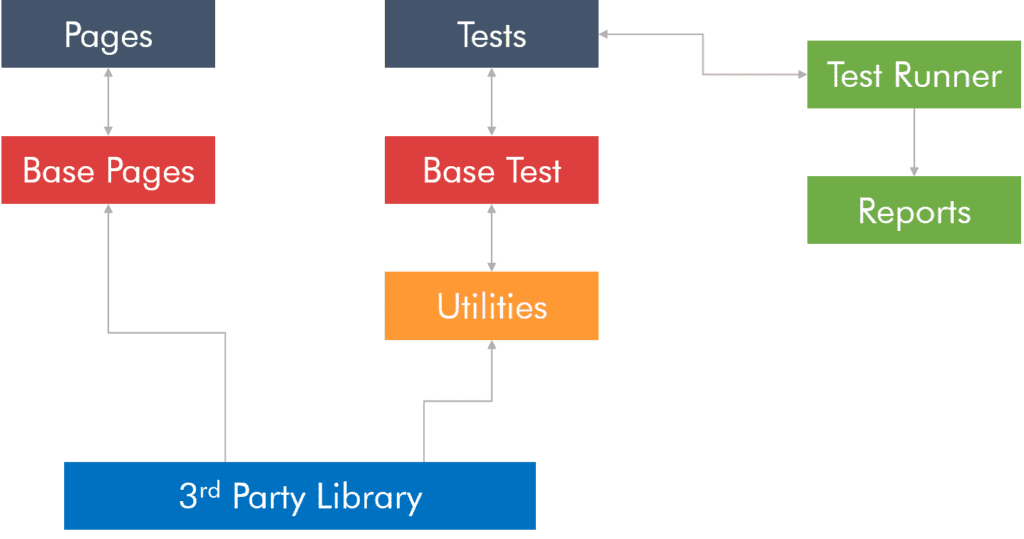
BasePage
BasePage is a class which contains the reusable methods that will be used by the various pages. For e.g., the BasePage class contains “getWebElement” method which will return a web-element when you pass the locator and the driver instances.
Pages
Pages are a set of classes, named based on the name of the webpage. For e.g., Login-Page, Home-Page, are so named because of the webpage they represent.
The Login-Page will contain the public methods to perform login, and private attributes for username and password fields. The private attributes for username and password fields will help maintain encapsulation of the unwanted information for the tests.
Indium follows a process-oriented approach for the successful deployment of Test Automation
Read More
BaseTest
BaseTest is a class which contains the reusable methods that will be used by the various tests. The BaseTest is expected to contain the “@BeforeTest”, “@AfterTest”, “@BeforeClass”, “@AfterClass” annotated methods to help manage the test sequence.
The BaseTest will also contain the reference to the public web driver variable which will be instantiated and initialized in the @BeforeTest or @BeforeClass method when the test initiates and continue as a static variable till the @AfterTest or @AfterClass methods is called to end the test.
Tests
Tests are a set of classes, named based on the test to be conducted for each webpage. For e.g., LoginTest, is so named because of the test method that would be used to test the Login page/action.
The LoginTest will contain the public methods annotated with “@Test” to test the login functionality.
The LoginTest will instantiate the LoginPage class, using the PageFactory.initElements method, and then will invoke the LoginPage log in method with data parameters for username and password which will set the values in the username and password fields in the web application, and click on the submit button. Validations need to be inserted post the submit button click so that the login can be validated. Boolean values are returned from the Login-Page, and assertions are performed at the test level for validations.
Utilities
Utilities contain the various reusable classes and methods for overall run of the test suite. An example of a utility class could be a TestListener implementation to capture screenshots in case of failures.
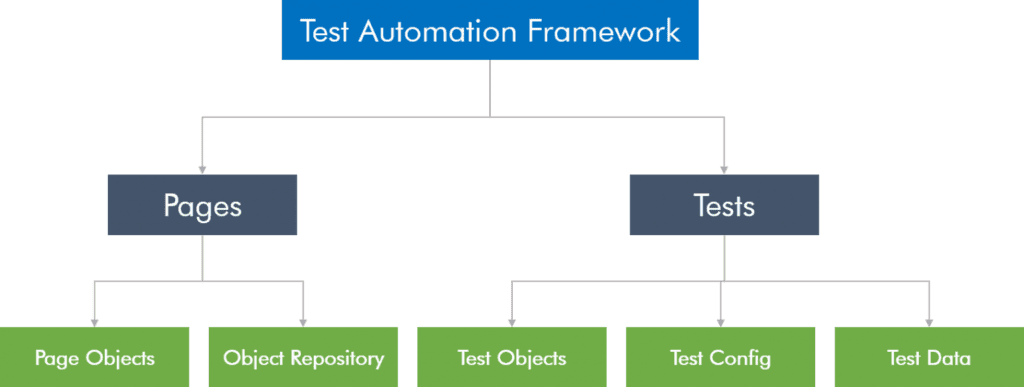
Project Structure of the Test Automation Framework
The project structure in Eclipse or IntelliJ could be as follows:
Steps to create the framework in Eclipse
Let us see how to create a new framework in Eclipse
- Create a new Maven Project
- Provide a suitable package name for your project :: com… is a good naming convention you can follow
- The folder structure would look like this: src/main/java, src/main/resources, src/test/java and src/test/resources
- All our code would code into two parts.
- Test Objects and Data Providers would go into src/test/java :: Meaning all testng related code should go into src/test/java
- Page Objects should go into /src/main/java
- You would have named your package when creating the maven package structure
- Within the src/main/java and src/test/java you would see your defined package name and a sample java file will be found. Remove these files.
- your project structure should look something like below.
- Under src/main/java you can have com….pages
- Under src/test/java you can have com….tests and com….datastore
- You can have sub packages within these main packages to identify with modules
A big disclaimer here: – This is only a suggested approach. You can choose from any different approaches out there.
Based on the choice of browsers you can use the TestNG structure to set up your base test.
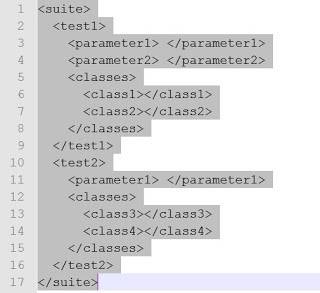
TestNG setup
You can give your browsername, version and OS platform in the TestNG file to distinguish between classes, tests or suite. Since I am going to use tests for my differentiation of browsers, I would use the following structure for testng.xml
PageObjects
For the page objects, you can have differences in how you identify and interact with elements. This is a sample code i have been using
public class LoginPage {
By txtUserName = By.id(“uid”);
By txtPassword = By.id(“password”);
By pageTitle =By.xpath(“html_title”);
By btnLogin = By.id(“btnLogin”);
TestObjects
For the tests, we would be using @Test annotations to define the tests.
@Test
public void TestClass1() {
// Test Code here
}
For the base test, you would need a @BeforeTest method which defines the browser and driver to be used.
This set up will be based on the parameters passed, or any initial configuration you have set up. From my code above, in the TestNG.xml, you see, i have parameters defined for every test. Generally these have to be very similar. The parameter in the test2 is superflous (not recommended)
@BeforeTest
public void beforeTest(String parameter1) {
// Here you define how you can set the driver
WebDriver driver = null;
If (parameter == “chrome”)
driver = new ChromeDriver();
else if (parameter == “firefox”)
driver = new FirefoxDriver();
}
Is Your Application Secure? We’re here to help. Talk to our experts Now
Inquire Now
I would like to stop here. This is something that gives one enough ammunition to start. More to come in the subsequent posts.
Don’t forget to leave your comments on improving this blog/post.
Thank you.