


- February 23, 2024
- Posted by: Vijendran B
- Category: Cloud Engineering

Introduction
Running applications in a Kubernetes cluster has many advantages, including scalability, flexibility, and ease of management. However, to make our applications highly available and resilient, we often need a load balancer to distribute the incoming traffic across multiple pods or nodes. Amazon Web Services (AWS) offers the Elastic Load Balancer (ELB) service, which can be integrated with our Kubernetes cluster to achieve this. This blog post will explore how to manage ELB for a Kubernetes cluster using the AWS Load Balancer Controller.

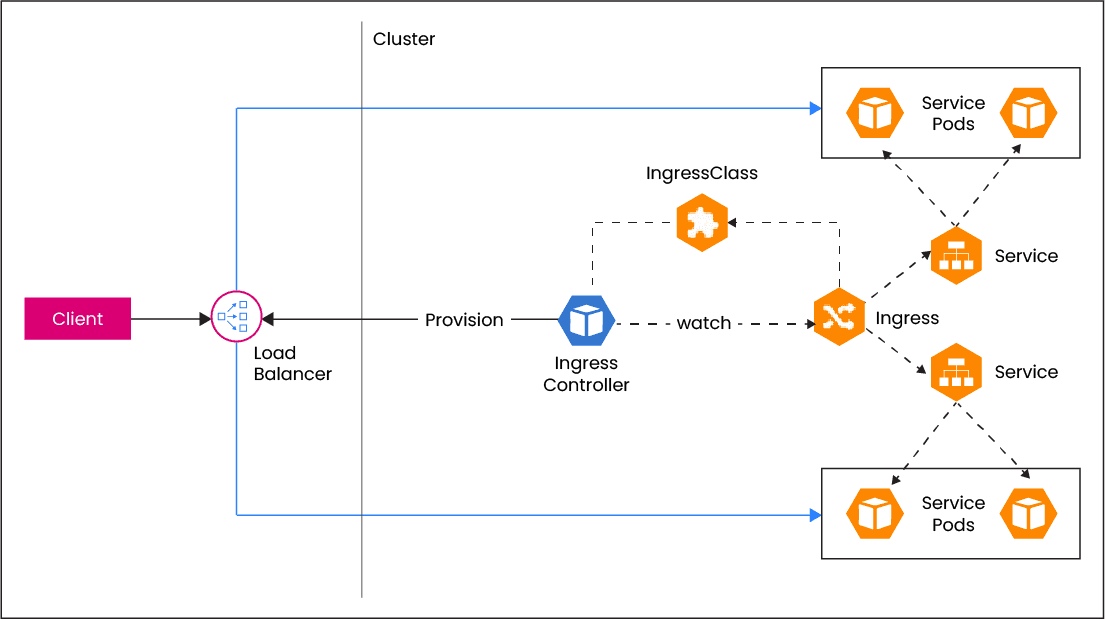
What is the AWS Load Balancer Controller?
The AWS Load Balancer Controller is an open-source project that simplifies the integration of AWS Elastic Load Balancers with Kubernetes clusters. A Kubernetes Ingress Controller automates the creation and management of AWS load balancers. This controller enables us to define Kubernetes resources like Ingress, Services, and Network Load Balancers as custom resources, making it easy to configure and manage AWS load balancers directly from our Kubernetes cluster.
Prerequisites:
Before we start managing ELBs with the AWS Load Balancer Controller, we should have the following prerequisites in place:
- An AWS account with appropriate permissions to create and manage load balancers.
- A running AWS EKS cluster.
- AWS CLI installed.
- Kubectl, the Kubernetes command-line tool, installed and configured to access our cluster.
- Helm, the package manager for Kubernetes, installed. In this example we will be using Helm for hassle-free installation.
Configuring the AWS Load Balancer Controller:
After installing the controller, we must configure it to manage our AWS load balancers. We can do this by creating an IAM policy, role, and ServiceAccount for the controller, as well as defining the necessary AWS annotations in our Kubernetes resources.
Visit Indium Software for expert solutions in Kubernetes cluster management and AWS integration. Elevate your application’s performance and reliability with our comprehensive services.
1. Create an IAM policy granting the controller the necessary permissions to manage AWS load balancers. We can use the AWS CLI to create this policy.
- Run the following command to download the policy document from github.
# curl -o iam-policy.json https://raw.githubusercontent.com/kubernetes-sigs/aws-load-balancer-controller/main/docs/install/iam_policy.json
- To create an IAM policy named AWSLoadBalancerControllerIAMPolicy for our worker node instance profile, run the following command:
# aws iam create-policy –policy-name AWSLoadBalancerControllerIAMPolicy I am running a few minutes late; my previous meeting is running over.
–policy-document file://iam-policy.json
2. Create an IAM role and associate the IAM policy with it. Make sure to trust the AWS service account for the controller.
- To get the cluster’s OIDC provider URL, run the below command
# aws eks describe-cluster –name <CLUSTER_NAME> –query “cluster.identity.oidc.issuer” I am running a few minutes late; my previous meeting is running over.
–output text
- The output will be something like this.
‘oidc.eks.<REGION_CODE>.amazonaws.com/id/EXAMPLE1234OI5DC1234OI5DCEXAMPLE”
- Next, copy the following contents and Replace <ACCOUNT_ID> with your AWS account ID. Replace <REGION_CODE> with the AWS Region in which the cluster is in. Replace <OIDC_URL> with the output returned in the previous step. After replacing the text, run the modified command to create the load-balancer-role-trust-policy.json file.
# cat >load-balancer-role-trust-policy.json <<EOF
{
“Version”: “2012-10-17”,
“Statement”: [
{
“Effect”: “Allow”,
“Principal”: {
“Federated”: “arn:aws:iam::<ACCOUNT_ID>:oidc-provider/<OIDC_URL>”
},
“Action”: “sts:AssumeRoleWithWebIdentity”,
“Condition”: {
“StringEquals”: {
“<OIDC_URL>: “sts.amazonaws.com”,
“<OIDC_URL>:sub”: “system:serviceaccount:kube-system:aws-load-balancer-controller”
}
}
}
]
}
EOF
- Create the IAM role.
# aws iam create-role I am running a few minutes late; my previous meeting is running over.
–role-name AmazonEKSLoadBalancerControllerRole I am running a few minutes late; my previous meeting is running over.
–assume-role-policy-document file://”load-balancer-role-trust-policy.json“
5. Attach the required Amazon EKS-managed IAM policy to the IAM role. Replace <ACCOUNT_ID> with our AWS account ID.
# aws iam attach-role-policy \
–policy-arn arn:aws:iam::<ACCOUNT_ID>:policy/AWSLoadBalancerControllerIAMPolicy \
–role-name AmazonEKSLoadBalancerControllerRole
3. Installing the AWS load balancer controller add-on
1. Run the update-kubeconfig AWS command to update the cluster name in the kubeconfig file and confirm that it updates the config file under ~/.kube/config:
# aws eks –region <REGION_CODE> update-kubeconfig –name cluster_name
2. Create the Kubernetes service account on our cluster. The Kubernetes service account named aws-load-balancer-controller is annotated with the IAM role that was created in the name AmazonEKSLoadBalancerControllerRole.
# cat >aws-load-balancer-controller-service-account.yaml <<EOF
apiVersion: v1
kind: ServiceAccount
metadata:
labels:
app.kubernetes.io/component: controller
app.kubernetes.io/name: aws-load-balancer-controller
name: aws-load-balancer-controller
namespace: aws-load-balancer-controller
annotations:
eks.amazonaws.com/role-arn: arn:aws:iam::<ACCOUNT_ID>:role/AmazonEKSLoadBalancerControllerRole
EOF
3. Run the below kubectl command to create the service account
# kubectl apply -f aws-load-balancer-controller-service-account.yaml
4. Install the AWS Load Balancer Controller using Helm V3
To install the AWS Load Balancer Controller, follow these steps:
- First, add the Helm chart repository for the AWS Load Balancer Controller:
# helm repo add eks https://aws.github.io/eks-charts
- Next, update the Helm repositories:
# helm repo update
- Create a namespace for the controller (optional but recommended):
# kubectl create namespace aws-load-balancer-controller
- Install the AWS Load Balancer Controller using Helm. Replace `<CLUSTER_NAME>` with the name of the Kubernetes cluster.
# helm upgrade -i aws-load-balancer-controller eks/aws-load-balancer-controller \
–namespace=aws-load-balancer-controller \
–set clusterName=<CLUSTER_NAME> \
–set serviceAccount.create=true \
–set serviceAccount.name=aws-load-balancer-controller
5. Verify the deployment
# kubectl get deployment -n aws-load-balancer-controller aws-load-balancer-controller
- Deploying a nginx image and exposing it as a Clusterip service.
# Sample Nginx deployment
apiVersion: apps/v1
kind: Deployment
metadata:
name: nginx
labels:
app: nginx
spec:
replicas: 1
selector:
matchLabels:
app: nginx
template:
metadata:
labels:
app: nginx
spec:
containers:
– name: nginx
image: nginx
ports:
– containerPort: 80
#SVC Exposing as clusterIP
apiVersion: v1
kind: Service
metadata:
labels:
app: nginx
name: nginx
spec:
ports:
– port: 80
protocol: TCP
selector:
app: nginx
Apply the deployment and service configuration by running the kubectl commands
# kubectl apply -f nginx_deploy.yml
To verify the deployment run the below command
# kubectl get deployment nginx
- Adding Ingress routes
Update the Ingress resource with AWS-specific annotations to control how the controller configures the load balancer.
For example, we can specify the load balancer type (e.g., Application Load Balancer or Network Load Balancer) and configure SSL termination, authentication, and other load balancer settings. Here we’ll be using AWS Certificate Manager (ACM) for configuring HTTPS, We need to provide the ACM arn in the annotation “alb.ingress.kubernetes.io/certificate-arn”
Here’s an example of an Ingress resource with AWS annotations:
apiVersion: networking.k8s.io/v1
kind: Ingress
metadata:
name: my-ingress
annotations:
kubernetes.io/ingress.class: alb
alb.ingress.kubernetes.io/scheme: internet-facing
alb.ingress.kubernetes.io/certificate-arn: <acm_ssl_arn>
alb.ingress.kubernetes.io/listen-ports: ‘[{“HTTP”: 80}, {“HTTPS”:443}]’
alb.ingress.kubernetes.io/actions.ssl-redirect: >-
{
“Type”: “redirect”,
“RedirectConfig”: {
“Protocol”: “HTTPS”,
“Port”: “443”,
“Host”: “#{host}”,
“Path”: “/#{path}”,
“Query”: “#{query}”,
“StatusCode”: “HTTP_301”
}
}
spec:
rules:
– host: demo-app.example.com
http:
paths:
– path: /
pathType: Prefix
backend:
service:
name: nginx
port:
number: 80
Once the controller is installed and configured, it will automatically create and manage AWS load balancers based on our Kubernetes resources. This means we can define and update our load balancers directly in our cluster’s YAML files, making it easier to manage our application’s network traffic.
Key benefits of managing ELBs with the AWS Load Balancer Controller:
- Simplified Configuration: The AWS Load Balancer Controller simplifies the process of creating and managing load balancers in AWS. Kubernetes manifests, such as Ingress resources, can be used to define routing rules, SSL certificates, and other load balancing configurations.
- Flexibility: We can define and update load balancers as Kubernetes resources, making it easy to scale and modify our application’s network setup.
- Automation: The controller automates the creation and management of AWS load balancers, reducing manual tasks and the risk of misconfigurations.
- Autoscaling: As your application scales, the AWS Load Balancer Controller dynamically adjusts the associated AWS resources to handle increased traffic. This ensures that your application remains highly available and responsive.
- Integration: AWS Load Balancer Controller integrates seamlessly with other AWS services, such as AWS Certificate Manager for SSL certificates and AWS Web Application Firewall for security.
- Consistency: The controller ensures that our AWS load balancers are consistent with our Kubernetes configuration, reducing the risk of drift.
Stay informed and optimize your AWS cloud infrastructure for enhanced performance.
Conclusion
Managing elastic load balancers for a Kubernetes cluster using the AWS load balancer controller simplifies the process of load balancer configuration and management. By integrating the controller with our cluster, we can define our load balancers as Kubernetes resources and let the controller handle the rest. This approach streamlines operations, increases automation, and ensures a consistent and reliable network infrastructure for our applications in the AWS cloud.