


- March 11, 2020
- Posted by: Srilatha M
- Category: Mendix

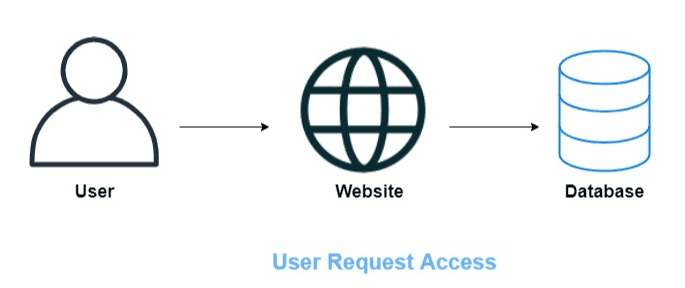
Process of Authentication without SSO:
Each website/application will maintain the individual database of the user’s credentials, like username & password, etc.
The website always will check the authentication has been done or not. If we won’t store the password’s to the site, then the application will redirect to the login page, to enter the credentials.
Then checks the entered username & password against the data in the corresponding database.

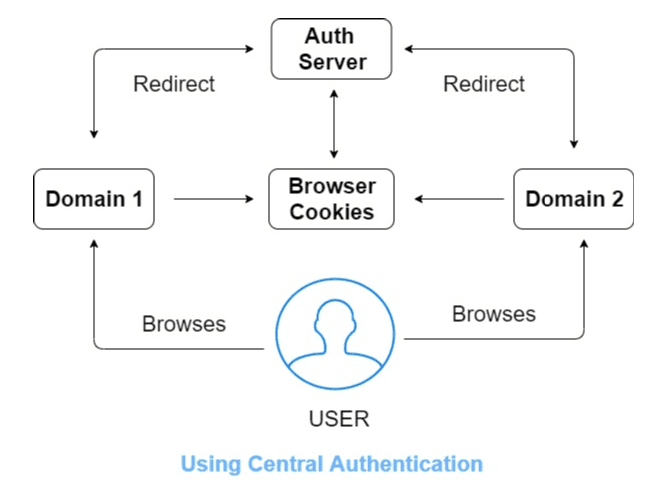
Process of Authentication with SSO:
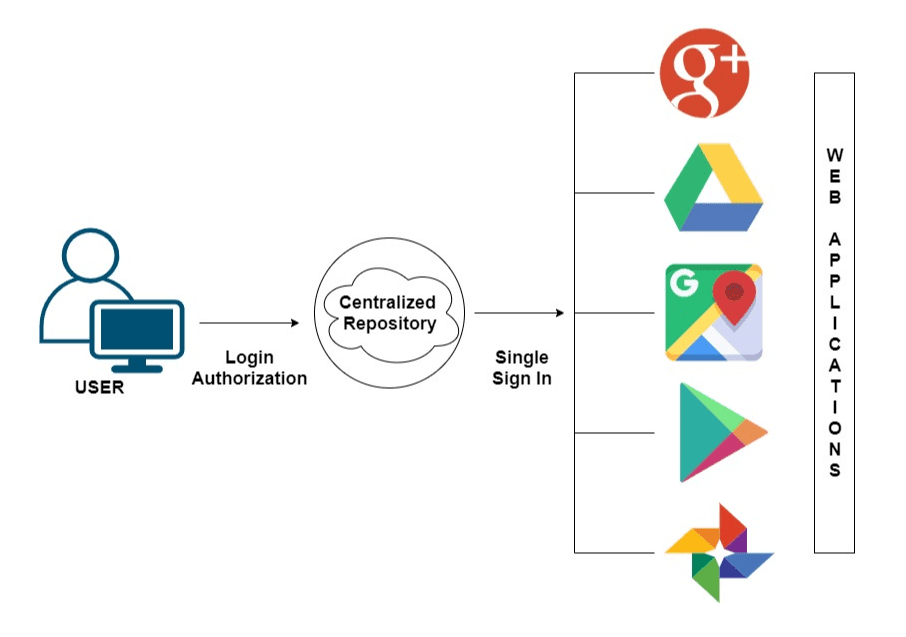
What is SSO?
SSO is a session and an authentication process that allows end-users to access multiple applications/systems with one set of login credentials, this feature meant to be as ‘Single Sign-On’ (SSO).
This reduces the risks by minimizing the wrong password hits by end-users, in order to access multiple applications.
And avoids the deals with the user management or password reset flows.

One of the popular examples, as we all are familiar that once we logged into Gmail account, which automatically obtains access to Google Drive, Google Photos, Google Analytics, Google Maps, and few other Google products.
Next Gen Product Development at your fingertips!
Read More
And once we logout from any of the Google apps, automatically logged out from all the apps, which is meant to be as ‘Single Logout’.

Mendix SSO module allows users to sign in with the Mendix account when the Mendix application is deployed to the MX cloud.
Using MX accounts it’s pretty easy to create multiple applications which all use the same sign-on mechanism.
SSO Integration Using MendixSSO module:
- Once after runs the Mendix application in the modeler, click on the view button in the desktop modeler.
- Now Home page of the application will be displayed, if the user wants to see the default Mendix SSO login button in the login page, and then type login.html instead of index.html.
- In the login screen default, MendixSSO button is not visible then proceed with the following steps to activate the SSO in Mendix application.
In addition, to adding the SSO mechanism to the existing Mendix application, to enable this we can add the SSO module from the Mendix AppStore directly.
Refer here for Mendix SSO Module => https://appstore.home.mendix.com/link/app/111349/Mendix/MendixSSO
- Download the MendixSSO module from appstore of Mendix, directly in the Mendix application.
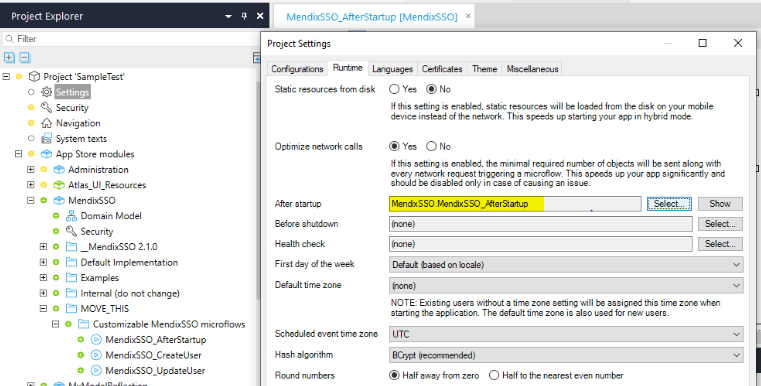
- Once the module has been imported successfully, add the following mentioned microflow “MendixSSO_AfterStartup” in the After Startup of Project runtime settings.
- Configuring the After Start up microflow (MendixSSO_AfterStartup) as follows:

And then turn on the project security to production and update the user roles (Administrator/User) in the required modules like MendixSSO.
Rename the original login.html file to login-without-sso & login-with-sso.html file to login.html in the theme folder of Mendix application.
Check out our articles on Mendix
Read More
After re-running the application, this adds the SSO button in sign in screen. Can find the theme folder path in the ‘Show Project Directory in Explorer’ in Project tab of Mendix application.
SSO Deactivation in Mendix:
Mendix has provided an ability to deactivate the SSO.
1. Can be done by renaming the following files:
- login.html to login-with-sso.html file and,
- login-without-sso file to login.html in the theme folder of Mendix application. This removes the SSO button on Sign-in screen.
2. Remove the following microflow “MendixSSO_AfterStartup” accordingly in the After Startup of Project runtime settings.
So that SSO will get deactivated when the next time deployment has been done after updating to these.
SSO Deletion in Mendix:
After deactivating the SSO mechanism, delete the MendixSSO module from the Mendix application from the Appstore modules folder of Project Explorer panel.
In case if errors related to SSO, just remove them accordingly from the application. So that SSO mechanism will get removed successfully from the Mx application.
Note:
Here I have created the Mendix profile and try to create the Mendix application with SSO mechanism, so if I logout from my Mendix profile (https://sprintr.home.mendix.com/index.html), then Mendix SSO application will look for Authentication, if not directly it will navigate to the respected page.
Mendix supports a wide range of SSO technologies as follows:
- OAuth
- SAML 2.0
- Kerberos
- LDAP
- MXID
These integrations can be accomplished using Mendix appstore modules. Let’s see how SAML integration can be done in Mendix platform.
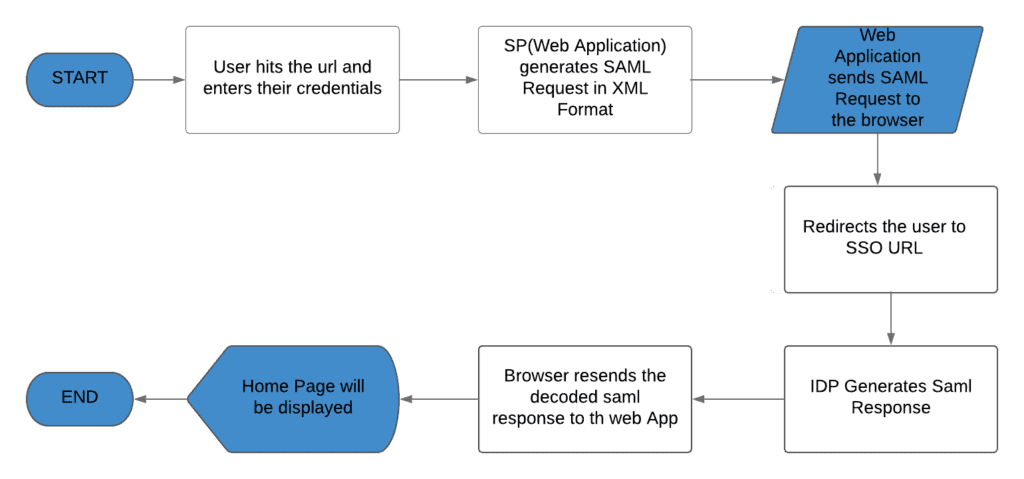
SAML Based SSO:
SAML is a Markup language based framework for authentication & authorization between Service and Identity provider entities.
Here is the SSO mechanism process flow:

Adding Mx SAML Module from Mx Appstore:
- Mendix provides SAML module in the app store.
- In addition, to add the SAML mechanism to the existing Mendix application, to enable this we can add the SAML module from the Mendix app store directly. Refer here for SAML Module =>
https://appstore.home.mendix.com/link/app/1174/Mendix/SAML
- Download the SAML module from app store of Mendix, directly in the Mendix application.
- Open the Mendix application locally, click on app store and search for SAML and click on ‘Import Module’.
- Once we add the Mendix provided SAML module from the app store, it will throw errors related to MxModelReflection.
Dependencies/Prerequisites:
- The Prerequisite for SAML is MXModelReflection, which is used for configuration purposes.
- Download the MXModelReflection module from app store of Mendix, in the mendix application. To do this open your Mendix application locally, click on app store and search for ‘MX Model reflection’ and click on ‘Import Module’.
- Refer here for Mx model Reflection Module =>
https://appstore.home.mendix.com/link/app/69/Mendix/Mx-Model-reflection
- Once after importing this module, Mx model errors will be fixed, run your application locally and click on view, to view the application
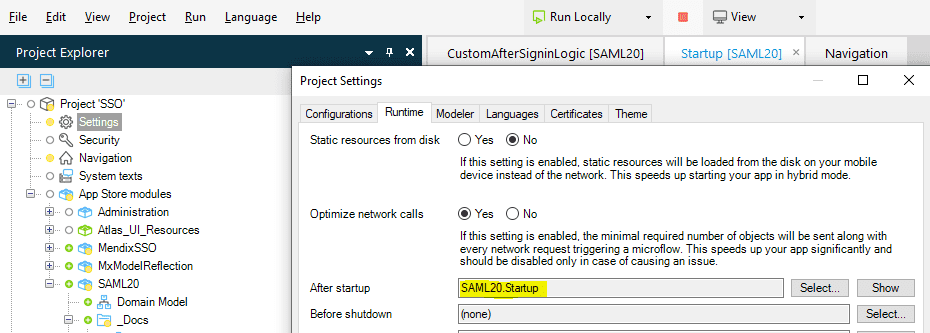
Configuring SAML:
One after importing the SAML & Mx Model Reflection modules from the app store in the application, configure the Startup microflow in the runtime project settings as follows:

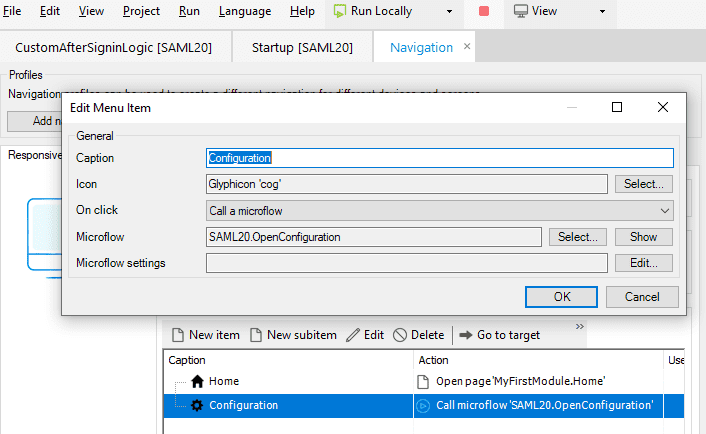
Then create the menu item In the project navigation in order to call the SAML Configuration microflow ‘OpenConfiguration’ as follows:

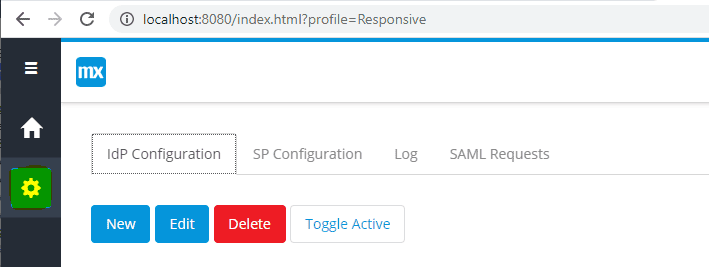
After creating the menu, re-run the application, then click on the View button. Click on the Configuration from the left-hand side menu. It will open Configuration as follows, with different configurations as IDP, SP, Log and SAML requests.

Fill out the SP Configuration details. Copy the URL Application and paste it in the Organization URL and fill the remaining details of Org and contact person.

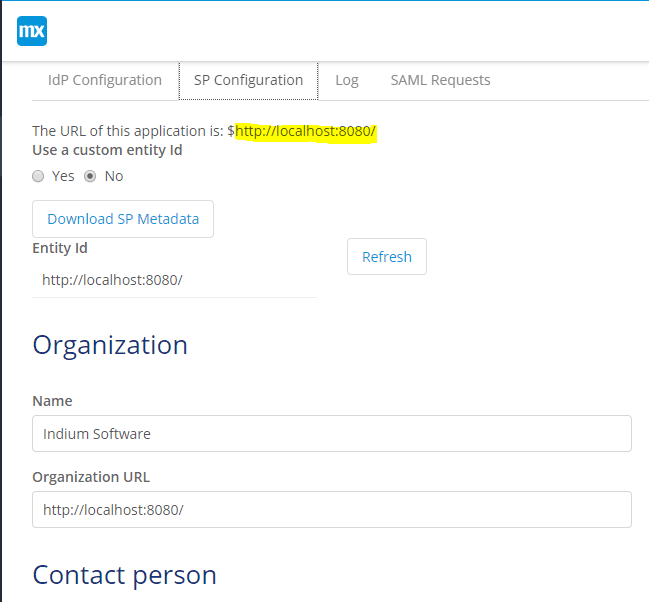
After filling the SP Configuration details, Click on Save. Then it will generate the Key Store alias, Last Changed on as below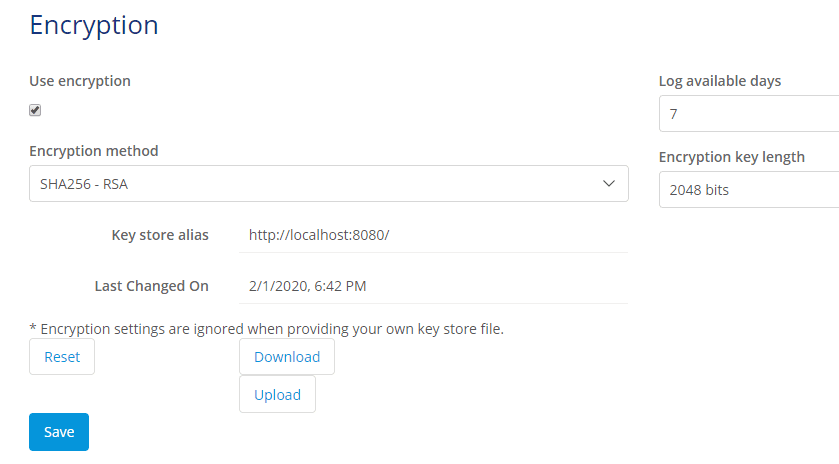
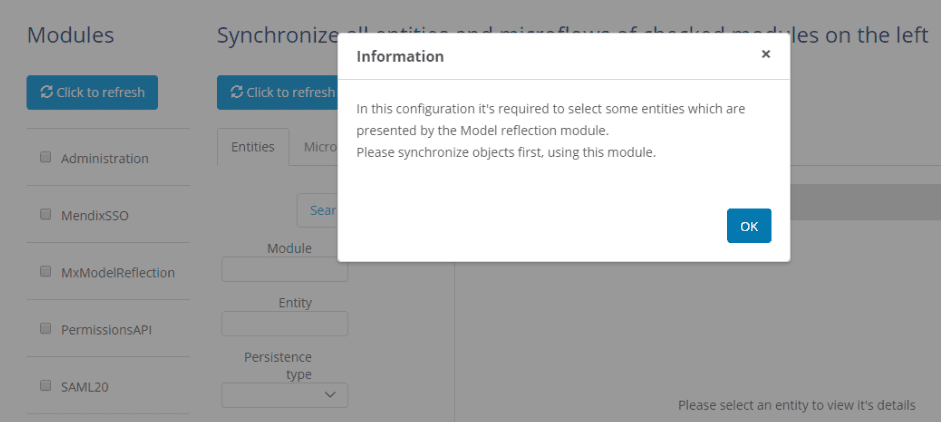
- Once SP Configuration is done, switch to IDP Configuration tab. Click on the New button, it will show-up a popup message as ‘Synchronized the modules’.
- Then check all modules and click refresh and then click refresh on Synchronize all entities and microflows of checked modules on the left, which looks as below:

- Once synchronizing is done, click on Next on the bottom of the page and again click on the New button in IDP Configuration. It will ask to fill the following details like alias name and IDP URL. For example in my case, I will use the following Metadata URL.
https://dev804898.oktapreview.com/app/exkh2rs4qvdWFSItr0h7/sso/saml/metadata

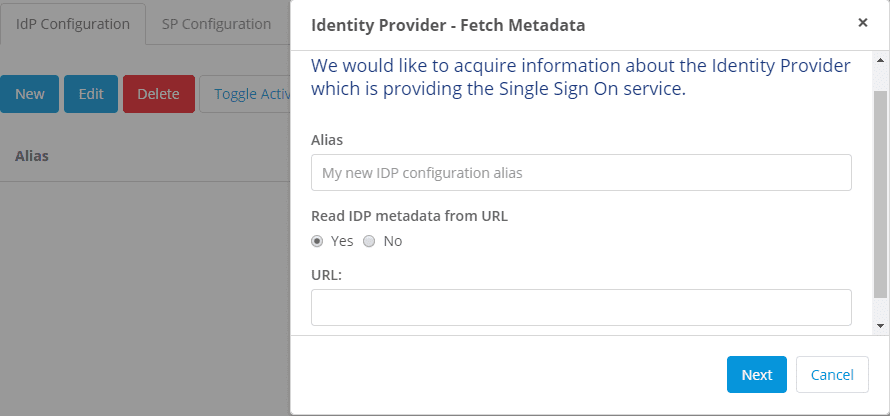
- Enter any name for an alias name
- Paste the metadata URL in the textbox click next
- Check “Allow IdP Initiated Authentication and click next
- Leave the IdP attributes as “IdP Provided ” and click next
- No need to select anything click next
- Click Submit
- Select the IDP and press the “toggle active” tab.
- Save and run the application ad check the url : https://localhost:8080/
Incase if SAML request fails then logs will be added under log tab of configuration, by filtering Success/failure of logon result.
From the lists of logs, we can select one and view the log information as well.
And SAML configuration module by default provides an option to view the list of SAML requests and can able to view, and able to export to csv file as well, by using ‘Export to CSV’ button.
SSO Advantages:
- This reduces the time spent by re-entering the end user credentials, so that improves the productivity.
- Instead of creating multiple sets of credentials, users can simply login once and can access related applications/products.
- Minimizes the complaints about password problems to Mendix Support for wrong credentials and password reset issues.
- For administrator, user management is simplified and centralized.
SSO Disadvantages:
Mendix SSO will not support in Native mobiles, it supports only in web applications.
Leverge your Biggest Asset Data
Inquire Now
Conclusion:
We can enable the Single Sign-On (SSO) mechanism with the Mx account is now managed from the Mendix SSO module by the Mendix app store instead of creating the logic from scratch.
And SSO integration process is pretty simple and easier to understand.