- February 2, 2023
- Posted by: Ganesh Ghadge
- Category: Data & Analytics

What is Kubeflow?
“Kubeflow is an open-source project created to help deployment of ML pipelines. It uses components as python functions for each step of pipeline. Each component runs on the isolated container with all the required libraries. It runs all the components in the series one by one.”

In this article we are going to train a custom machine learning model on Vertex AI using Kubeflow Pipeline.
About Dataset
Credit Card Customers dataset from Kaggle will be used. The 10,000 customer records in this dataset include columns for age, salary, marital status, credit card limit, credit card category, and other information. In order to predict the customers who are most likely to leave, we must analyse the data to determine the causes of customer churn.
Interesting Read: In the world of hacking, we’ve reached the point where we’re wondering who is a better hacker: humans or machines.
Let’s Start
Custom Model Training
Step 1: Getting Data
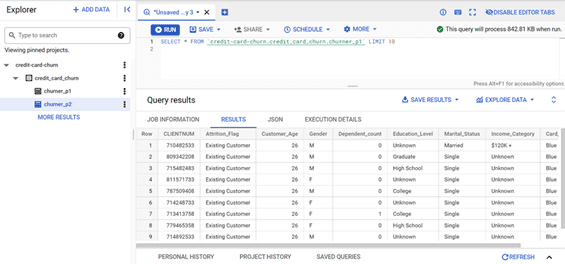
We will download the dataset from GitHub. There are two csv files in the downloaded dataset called churner_p1 and churner_p2, I have created a Big Query dataset credit_card_churn with the tables as churner_p1 and churner_p2 with this csv files. I have also created the bucket called credit-card-churn on Cloud Storage. This bucket will be used to store the artifacts of the pipeline
Step 2: Employing Workbench
Enable the Notebook API by going to Vertex AI and then to the Workbench section. Then select Python 3 by clicking on New Notebook. Make sure to choose the us-central1 region.
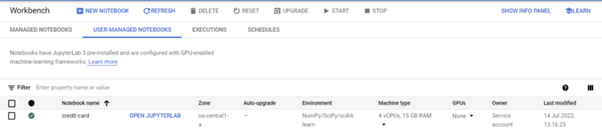
It will take a few minutes to create the Notebook instance. Once the notebook is created click on the Open JupyterLab to launch the JupyterLab.
We will also have to enable the following APIs from API and services section of Vertex AI.
- Artifact Registry API
- Container Registry API
- AI Platform API
- ML API
- Cloud Functions API
- Cloud Build API
Now click on the Python 3 to open a jupyter notebook in the JupyterLab Notebook section and run the below code cells.
USER_FLAG = “–user”
!pip3 install {USER_FLAG} google-cloud-aiplatform==1.7.0
!pip3 install {USER_FLAG} kfp==1.8.9
This will install google cloud AI platform and Kubeflow packages. Make sure to restart the kernel after the packages are installed.
import os
PROJECT_ID = “”
# Get your Google Cloud project ID from gcloud
if not os.getenv(“IS_TESTING”):
shell_output=!gcloud config list –format ‘value(core.project)’ 2>/dev/null
PROJECT_ID = shell_output[0]
print(“Project ID: “, PROJECT_ID)
Create the variable PROJECT_ID with the name of project.
BUCKET_NAME=”gs://” + PROJECT_ID
BUCKET_NAME
Create the variable BUCKET_NAME, this will return the same bucket name we have created earlier.
import matplotlib.pyplot as plt
import pandas as pd
from kfp.v2 import compiler, dsl
from kfp.v2.dsl import pipeline, component, Artifact, Dataset, Input, Metrics, Model, Output, InputPath, OutputPath
from google.cloud import aiplatform
# We’ll use this namespace for metadata querying
from google.cloud import aiplatform_v1
PATH=%env PATH
%env PATH={PATH}:/home/jupyter/.local/bin
REGION=”us-central1″
PIPELINE_ROOT = f”{BUCKET_NAME}/pipeline_root/”
PIPELINE_ROOT
This will import required packages and create the pipeline folder in the credit-card-churn bucket.
#First Component in the pipeline to fetch data from big query.
#Table1 data is fetched
@component(
packages_to_install=[“google-cloud-bigquery==2.34.2”, “pandas”, “pyarrow”],
base_image=”python:3.9″,
output_component_file=”dataset_creating_1.yaml”
)
def get_data_1(
bq_table: str,
output_data_path: OutputPath(“Dataset”)
):
from google.cloud import bigquery
import pandas as pd
bqclient = bigquery.Client()
table = bigquery.TableReference.from_string(
bq_table
)
rows = bqclient.list_rows(
table
)
dataframe = rows.to_dataframe(
create_bqstorage_client=True,
)
dataframe.to_csv(output_data_path)
The first component of the pipeline will fit the data from the table churner_p1 from big query and pass the csv file as the output for the next component. The structure is the same for every component. We have used the @component decorator to install the required packages and specify the base image and output file, then we create the get_data_1 function to get the data from big query.
#Second Component in the pipeline to fetch data from big query.
#Table2 data is fetched
#First component and second component doesnt need inputs from any components
@component(
packages_to_install=[“google-cloud-bigquery==2.34.2”, “pandas”, “pyarrow”],
base_image=”python:3.9″,
output_component_file=”dataset_creating_2.yaml”
)
def get_data_2(
bq_table: str,
output_data_path: OutputPath(“Dataset”)
):
from google.cloud import bigquery
import pandas as pd
bqclient = bigquery.Client()
table = bigquery.TableReference.from_string(
bq_table
)
rows = bqclient.list_rows(
table
)
dataframe = rows.to_dataframe(
create_bqstorage_client=True,
)
dataframe.to_csv(output_data_path)
The second component of the pipeline will fit the data from the table churner_2 from big query and pass the csv file as the output for the next component. The first component and second component do not need inputs from any components.
#Third component in the pipeline to to combine data from 2 sources and for some data transformation
@component(
packages_to_install=[“sklearn”, “pandas”, “joblib”],
base_image=”python:3.9″,
output_component_file=”model_training.yaml”,
)
def data_transformation(
dataset1: Input[Dataset],
dataset2: Input[Dataset],
output_data_path: OutputPath(“Dataset”),
):
from sklearn.metrics import roc_curve
from sklearn.model_selection import train_test_split
from joblib import dump
from sklearn.metrics import confusion_matrix
from sklearn.tree import DecisionTreeClassifier
from sklearn.ensemble import RandomForestClassifier
import pandas as pd
data1 = pd.read_csv(dataset1.path)
data2 = pd.read_csv(dataset2.path)
data=pd.merge(data1, data2, on=’CLIENTNUM’, how=’outer’)
data.drop([“CLIENTNUM”],axis=1,inplace=True)
data = data.dropna()
cols_categorical = [‘Gender’,’Dependent_count’, ‘Education_Level’, ‘Marital_Status’,’Income_Category’,’Card_Category’]
data[‘Attrition_Flag’] = [1 if cust == “Existing Customer” else 0 for cust in data[‘Attrition_Flag’]]
data_encoded = pd.get_dummies(data, columns = cols_categorical)
data_encoded.to_csv(output_data_path)
The third component is where we have combined the data from the first and second component and did the data transformation such as dropping the “CLIENTNUM” column, dropping the null values and converting the categorical columns into numerical. we will pass this transformed data as csv to the next component.
#Fourth component in the pipeline to train the classification model using decision Trees or Randomforest
@component(
packages_to_install=[“sklearn”, “pandas”, “joblib”],
base_image=”python:3.9″,
output_component_file=”model_training.yaml”,
)
def training_classmod(
data1: Input[Dataset],
metrics: Output[Metrics],
model: Output[Model]
):
from sklearn.metrics import roc_curve
from sklearn.model_selection import train_test_split
from joblib import dump
from sklearn.metrics import confusion_matrix
from sklearn.ensemble import RandomForestClassifier
import pandas as pd
data_encoded=pd.read_csv(data1.path)
X = data_encoded.drop(columns=[‘Attrition_Flag’])
y = data_encoded[‘Attrition_Flag’]
X_train, X_test, y_train, y_test = train_test_split(X, y, test_size=0.2, random_state=100,stratify=y)
model_classifier = RandomForestClassifier()
model_classifier.fit(X_train,y_train)
y_pred=model_classifier.predict(X_test)
score = model_classifier.score(X_test,y_test)
print(‘accuracy is:’,score)
metrics.log_metric(“accuracy”,(score * 100.0))
metrics.log_metric(“model”, “RandomForest”)
dump(model_classifier, model.path + “.joblib”)
In the fourth component we will train the model with the Random Classifier and we have used the “accuracy” as the evaluation metric.
@component(
packages_to_install=[“google-cloud-aiplatform”],
base_image=”python:3.9″,
output_component_file=”model_deployment.yaml”,
)
def model_deployment(
model: Input[Model],
project: str,
region: str,
vertex_endpoint: Output[Artifact],
vertex_model: Output[Model]
):
from google.cloud import aiplatform
aiplatform.init(project=project, location=region)
deployed_model = aiplatform.Model.upload(
display_name=”custom-model-pipeline”,
artifact_uri = model.uri.replace(“model”, “”),
serving_container_image_uri=”us-docker.pkg.dev/vertex-ai/prediction/sklearn-cpu.0-24:latest”
)
endpoint = deployed_model.deploy(machine_type=”n1-standard-4″)
# Save data to the output params
vertex_endpoint.uri = endpoint.resource_name
vertex_model.uri = deployed_model.resource_name
Fifth component is the last component, in this we will create the endpoint on the Vertex AI and deploy the model. We have used Docker as base IMAGE and have deployed the model on “n1-standard-4” machine.
@pipeline(
# Default pipeline root. You can override it when submitting the pipeline.
pipeline_root=PIPELINE_ROOT,
# A name for the pipeline.
name=”custom-pipeline”,
)
def pipeline(
bq_table_1: str = “”,
bq_table_2: str = “”,
output_data_path: str = “data.csv”,
project: str = PROJECT_ID,
region: str = REGION
):
dataset_task_1 = get_data_1(bq_table_1)
dataset_task_2 = get_data_2(bq_table_2)
data_transform=data_transformation(dataset_task_1.output,dataset_task_2.output)
model_task = training_classmod(data_transform.output)
deploy_task = model_deployment(model=model_task.outputs[“model”],project=project,region=region)
In the last we have pipeline function which will call all the components in the sequential manner: dataset_tast_1 and dataset_tast_2 will get the data from the big query, data_transform will transform the data, model_task will train the Random Classifier model and deploy_task will deploy the model on Vertex AI.
compiler.Compiler().compile(pipeline_func=pipeline, package_path=”custom-pipeline-classifier.json”)
Compiling the pipeline.
run1 = aiplatform.PipelineJob(
display_name=”custom-training-vertex-ai-pipeline”,
template_path=”custom-pipeline-classifier.json”,
job_id=”custom-pipeline-rf8″,
parameter_values={“bq_table_1”: “credit-card-churn.credit_card_churn.churner_p1″,”bq_table_2”: “credit-card-churn.credit_card_churn.churner_p2”},
enable_caching=False,)
Creating the pipeline job.
run1.submit()
Running the pipeline job.
With this we have completed creating the Kubeflow pipeline and we can see it on the Pipelines section of Vertex AI.
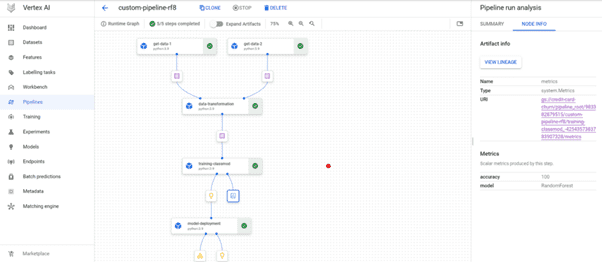
Our Pipeline has run successfully and we have managed to get 100% accuracy for the classification.
We can use this model to get the online prediction using Rest API or Python. We can also create the different pipelines and compare their metrics on Vertex AI.
With this we have completed the project and learned how to create the Pipeline on Vertex AI for custom train models.
I hope you will find it useful.
To learn more about our AI & ML Solutions and Capabilities
Contact Us
See you again.