- April 21, 2023
- Posted by: Harsh Gajjar
- Category: Data & Analytics

Introduction
Keeping up-to-date with the latest code changes in a GitHub repository is important for team members on a project. However, constantly monitoring a repository for changes can be time-consuming and tedious. To solve this obstacle, we can use a combination of GitHub webhooks, cloud functions, and Slack to receive notifications of code changes in real time. However there are other communication tools such as Discord, Twilio, Email, HipChat, Mattermost, etc which are easily integrated with GitHub Webhooks.
In this article, I’ll walk you through the process of setting up this solution with a step-by-step guide. By the end of this article, you’ll be able to receive real-time notifications of code changes in your GitHub repository via Slack, without the need for constant monitoring.
Prerequisites
Below are the prerequisites you need before setting up the solution.
- Google Cloud Platform (GCP) account with the necessary billing setup
- Google Cloud Service account with appropriate role
- GitHub account with administrator or owner privileges for the repository
- Slack account and workspace with administrator privileges
To set up a Google Cloud Platform (GCP) account, please use this link and click on Get started for free.
Architecture
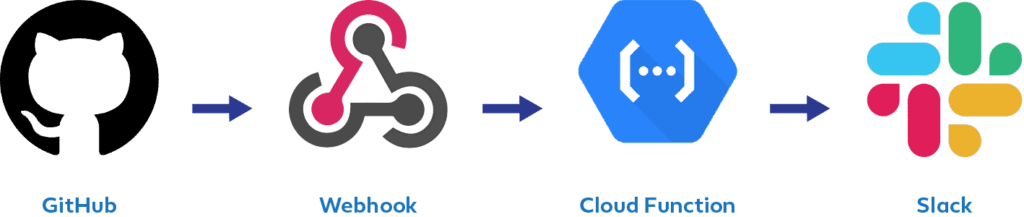
The architecture consists of four main components: GitHub, GitHub Webhook, Cloud Function, and Slack. The architecture diagram is as follows:
Here, the GitHub repository serves as the source of code change. When a new file is inserted or editing is pushed to the repository, a webhook event is automatically triggered.
A Google Cloud Function running on Google Cloud receives the webhook event and the Cloud Function is responsible for event payload and sending a message to Slack.
The Slack channel is where the notification is sent to alert the team of the code changes and whatever we print in the cloud function will print the same message.
By using these four components, we can create a streamline system for receiving notifications of code changes in real-time.
Setting up GitHub Webhook
The GitHub webhook allows you to receive real-time HTTP POST payloads whenever some event occurs in the GitHub repository. This is used to trigger automated action outside of GitHub and send a message such as Slack or trigger a cloud function. Examples of events that trigger a webhook include creating a new branch, pushing the code to the repository, editing the README file, etc.
Follow the following steps to setting up a Git Repository and Webhook:
1. Log in to the GitHub account and create a new repository by clicking the “+” icon on the top of the right corner and selecting “New respiratory”.
2. Provide a Respiratory name, under the description choose “Public” and click on Add “a README file”. At the end click on Create repository.
3. Once the above two steps are done, click on setting then select “Webhooks” from the menu on the left-hand side.
4. Click on the “Add webhook” button to create a new webhook.
5. In the “Payload URL” field, enter the URL for the Cloud Function that we created earlier.
(https://<region>-<project_id>.cloudfunctions.net/<google_cloud_function_name>)
Here replaces the region with your cloud_function_region that you provide while you create a cloud function, project_id is your GCP project_id and google_cloud_function_name with your cloud function name.
6. Set the Content type to “application/x-www-form-urlencoded”.
7. Under the SSL verification choose “Disable (not recommended)”.
8. Select the events that you want to trigger. In this case, you select “Pushes” under Let me select individual events.
9. Finally, click the “Add webhook” button to create the webhook.
Setting up Cloud Function
The GCF (Google Cloud Function) is a Function as a service offering and it is a serverless computing service provided by GCP. It allows us to create a small and single-purpose function that will automatically scale on demand. This function supports several languages such as Python, Go, Node, JavaScript, Dot Net, PHP, and Ruby. We can trigger events by multiple resources like Cloud Storage, Pub/Sub, HTTP, Cloud Firestore, etc.
Cloud Function time ranges between 1 second to 540 seconds which is 9 minutes.
Follow the below steps to setting up Cloud Function:
1. Go to the Cloud Console page and navigate to the Cloud Function.
2. Click on the “CREATE FUNCTION” button to create a new GCF.
3. Provide the function name and choose the preferred region.
4. Under the Trigger, choose “HTTP.”
5. The moment you click on HTTP, you will get one URL that looks like this:
https://<region>-<project_id>.cloudfunctions.net/<google_cloud_function_name>
6. In the Authentication, choose Allow unauthenticated invocations. It will create a public API.
7. Next click on SAVE.
8. Once you click SAVE, it will redirect to the Code page.
9. Under “Runtime”, select “Python 3.7” as the runtime.
10. Under “Entry point”, enter the name of the python function that will handle the webhook event. In this case, I used “gcf_github”.
11. Under “Source code”, select “Inline editor” and paste in the code for your python function.
Python Code
import requests
from requests.structures import CaseInsensitiveDict
def gcf_github(request):
try:
print(“An event has been triggered on GitHub and sent to the webhook.”)
url = “<paste_your_slack_url>”
headers = CaseInsensitiveDict()
headers[“Content-Type”] = “application/json”
data = ‘{“text”:”Your code changes have been successfully committed to the repository”}’
repo = requests.post(url,headers=headers,data=data)
print(repo.status_code)
except Exception as e:
print(“Error: “, e)
Here, replaces paste_your_lack_url with your Slack URL.
(To generate a Slack URL, kindly follow step no. 10 under setting up Slack API in the Setting up Slack Notification section)
12. At last, click on the “DEPLOY” button.
Setting up Slack Notifications
Slack is a cloud-based communication and collaboration platform that is designed for organizations and teams to communicate and work together. Slack provides a centralized hub so the team can easily send and receive messages, share files, and make voice and video calls as well.
Slack also supports third-party application integration, so we can bring other tools and direct use into Slack such as Trello and Asana for project management tools, and for the calendar application, it supports Google Calendar and Outlook.
Follow the below steps to setting up Slack Application:
- Go to the official website of Slack and click on Sign in. If you don’t have an account in Slack, please create a new account.
- Once you log in, click on “Create a workspace” to create a new workspace for Slack.
- In Step 1 –“ What’s the name of your company or team” question write the appropriate answer.
- We can skip step 2 because it is not mandatory.
- In Step 3 – the “What’s your team working on right now” question write an appropriate answer.
- Once you follow all the above steps, you will see your workspace is active and on the left-hand side you will see a couple of channels such as #do-some-testing, #general, and #random.
Our next step is to set up Slack API.
Slack API is a set of tools and protocols that we can use to build custom integrations and applications that interact with the Slack program. The Slack API allows access and manipulation of data within channels, messages, users, etc.
Follow the below steps to setting up Slack API:
- Go to the official website of the Slack API.
- Open the official website and click on “Create New App” to create a new application.
- Click on From Scratch option.
- Provide the App Name and under the pick a workspace to develop your app option choose the slack workspace that you created above.
- Click on Create App button.
- Click on “Incoming Webhooks” which is under the Features in the left-hand side panel.
- Turn on “Activate Incoming Webhooks” in the toggle button.
- Scroll down and select the “Add New Webhook to Workspace” button to add a new webhook.
- At last, choose the channel name that you created earlier. Don’t choose #general and #random channels.
Sample curl request to post to a channel and Webhook URL will look like:
curl -X POST -H ‘Content-type: application/json’ –data ‘{“text”:”Hello, World!”}’ https://hooks.slack.com/services/…
Webhook URL: https://hooks.slack.com/services/…
10. Copy the “Sample curl request to post to a channel” and “Webhook URL” to the notepad.
Testing the integration
Once you set up GitHub Repository, GitHub webhook, Cloud Function, and Slack, now it’s time to test the integration whether everything is working as per exception or not.
For the testing integration, do some changes to the GitHub repository that you created earlier. It could be just a simple change, whether editing a README-File or adding a new file to the repository.
Once you made code changes, you will see a notification appear in the slack channel that is the same as we mentioned in the python code which is “Your code changes have been successfully committed and pushed to the repository”.
If you didn’t see any notification or message in Slack or you will see other notifications, there is some issue with the Cloud Function, Webhook, or Slack. Some issues or troubleshooting errors may happen such as Webhook not firing, Cloud function not receiving events, or Incorrect or incomplete notifications. Please follow all the above steps once again to check or solve errors such as creating or setting up a GitHub Webhook, Cloud Function, and Slack.
Conclusion
In this article, I have discussed how to get notifications of code changes in real-time using GitHub Repository, GitHub webhooks, Cloud Function, and Slack. By integrating all the above tools, you receive an instant notification when the code is changed or uploads any new files to the repository. It allows us to stay up-to-date on our team’s progress. If there is any issue, so we can easily catch any conflicts early on. By storing and analyzing notification data over time, we can gain valuable insights, for example we can track which team members are making the most code changes or which branch is most active, and which repository has conflicts.
Get started on setting up your real-time code changes alert today!
Visit Us