- May 24, 2023
- Posted by: Sindhuja Sunil
- Category: Digital Assurance


Introduction
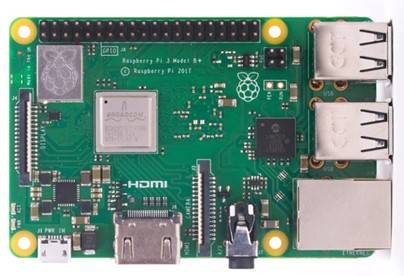
The Raspberry Pi is a device that can be easily configured with the cameras and can open infinite opportunities for us to create our own home automation projects, which is popular among people in the open-source community. IoT is now incorporated for many smart systems.
Since connecting a raspberry pi to security cameras is practically a DIY project and a very inexpensive product, both of which can be used in security monitoring.
What is Raspberry Pi
A low-cost, credit card-sized computer called the Raspberry Pi runs Linux. It has a set of GPIO (general purpose input/output) pins that can be connected to a computer monitor or TV using HDMI, and it is an open-source operating system. Using this feature, you can explore the Internet of Things (IoT), which can be used as security devices connected to the Raspberry Pi for home automation security systems, and control electronic components for physical computing, such as IP Cameras.
The Raspberry Pi has been released in several iterations and variants. The price range for Raspberry Pi has historically been roughly between 1000 and 3000 INR.
How Raspberry Pi is connected to the Camera
The first step is to purchase a raspberry pi device of your choice as well as a wired or wireless IP camera.
As an illustration, I use a Raspberry Pi computer that I purchased from Amazon, along with an SD card on which the Raspberry Pi installation package will be placed.
Installing a Raspberry package on a micro-SD card: steps.
Step1: Download the Raspberry package as per your requirements from the latest Raspberry website.
Step 2: Connect the SD card with the system USB drive to format (if the fresh SD card does not need to be formatted).
Note: The SD card should be formatted before copying the Raspberry Package.
Note: Insert your SD card into the card reader on your Laptop or PC and copy the raspberry package using the Etcher tool.
Step 3: Steps to copy the Raspberry Package to an SD Card.
Step 3.1: Install the “Etcher” tool link: https://www.balena.io/etcher/
Step 3.2: Click the Select Image button (Fig. 2) to choose the Raspberry package.

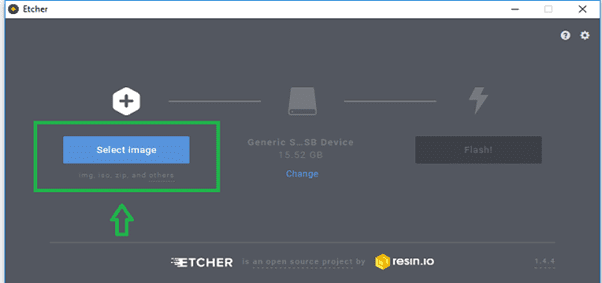
Step 3.3:
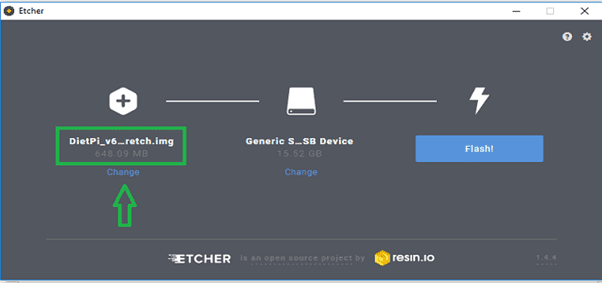
Once the Raspberry package is selected, the SD card drive path will be shown automatically. Click on the Flash! button. (Fig.3)
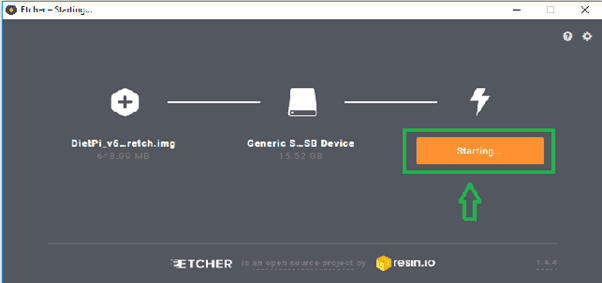
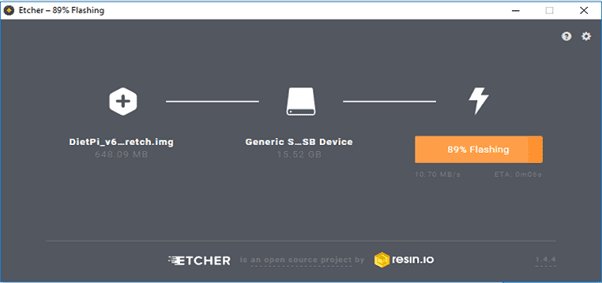
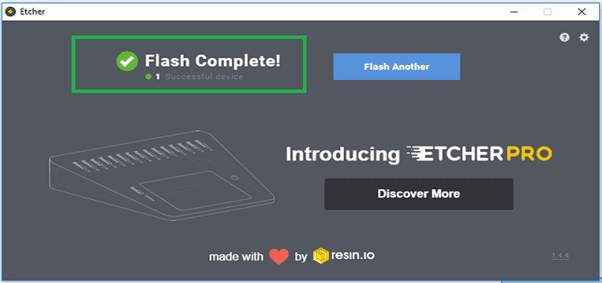

Note: Eject the SD card properly once flashing has completed.
Please note that I have used a 16GB SD card, 4GB for OS, and the Raspberry Pi package’s remaining 12 GB automatically partitioned for video footage. These are the video files from the camera stored when we stream the IP camera.
How do we test the live streaming with the Raspberry Pi?
For testing live streaming, we can use two different platforms.
1. Raspberry Pi – Cameras and Local storage
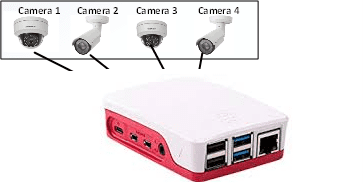
The user can directly connect the cameras to the Raspberry Pi, either wired or wireless, and start recording on the SD card on which the Raspberry Pi is packaged.
The SD card-recorded videos can be viewed from any browser client or mobile device with video surveillance software or application.
2. Raspberry Pi: Cameras and Cloud Storage

Both the SD card and the cloud will be able to store the recordings in this case if the user directly connects the cameras to the Raspberry Pi using wired or wireless connections. The camera will typically be configured using a MAC address or IP address when we are connecting it to the video surveillance tool. A list of the cameras on your network will be provided when you connect your raspberry pi to the same network as the camera.
The user can choose the camera that needs to be added and then enter camera information (using the camera credentials that the camera manufacturer has provided). The user can view the camera from the “Live Tab” after the camera has been added successfully.
Tools used for testing
1. The software for the Raspberry Pi is installed using the Etcher tool.
2. Software or an app for watching live or recorded videos from a security camera
Start Streaming Today! Harness the potential of Raspberry Pi and kickstart your live streaming journey now.
Click here
Conclusion
The Raspberry Pi is a powerful and adaptable gadget. The aforementioned use cases show that there are numerous possibilities when building a project with a Raspberry Pi and an IP camera, including security and surveillance, home automation, and more.
Making a baby monitor powered by a Raspberry Pi is an additional potential project. You can monitor your baby from anywhere in the house by connecting an IP camera to your Raspberry Pi and setting it up to stream video to your phone or tablet. Since Python will be used for the majority of the codes used to integrate cameras into Raspberry Pi devices, having a solid understanding of Raspberry Pi can also help you advance your Python skills.
The Raspberry Pi is an all-around capable and flexible platform that can be used for a variety of projects. The right software and hardware can be used to build a sophisticated system that is highly customizable and meets your unique requirements.


