


Training Custom Machine Learning Model on Vertex AI with TensorFlow
- February 3, 2023
- Posted by: Ganesh Ghadge
- Category: Data & Analytics

“Vertex AI is Googles platform which provides many Machine learning services such as training models using AutoML or Custom Training.”
AutoML vs Custom Training
To quickly compare AutoML and custom training functionality, and expertise required, check out the following table given by Google.
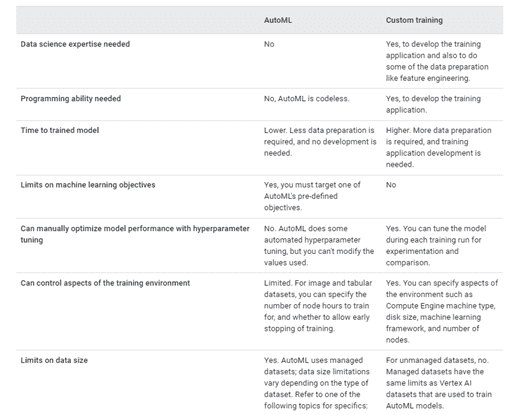
Choose a training method | Vertex AI | Google Cloud
In this article we are going to train the Custom Machine Learning Model on Vertex AI with TensorFlow.
To know about Vertex AI’s AutoML feature read my previous blog : Machine Learning using Google’s Vertex AI.
About Dataset
We will be using Crab Age Prediction dataset from Kaggle. The dataset is used to estimate the age of the crab based on the physical attributes.
To learn more about how our AI and machine learning capabilities can assist you.
Click here
There are 9 columns in the Dataset as follows.
- Sex: Crab gender (Male, Female and Indeterminate)
- Length: Crab length (in Feet; 1 foot = 30.48 cms)
- Diameter: Crab Diameter (in Feet; 1 foot = 30.48 cms)
- Height: Crab Height (in Feet; 1 foot = 30.48 cms)
- Weight: Crab Weight (in ounces; 1 Pound = 16 ounces)
- Shucked Weight: Without Shell Weight (in ounces; 1 Pound = 16 ounces)
- Viscera Weight: Viscera Weight
- Shell Weight: Shell Weight (in ounces; 1 Pound = 16 ounces)
- Age: Crab Age (in months)
We must predict the Age column with the help of the rest of the columns.
Let’s Start
Custom Model Training
Step 1: Getting Data
We will download the dataset from Kaggle. There is only one csv file in the downloaded dataset called CrabAgePrediction.csv, I have uploaded this csv to the bucket called vertex-ai-custom-ml on Google Cloud Storage.
Step 2: Working on Workbench
Go to Vertex AI, then to Workbench section and enable the Notebook API. Then click on New Notebook and select TensorFlow Enterprise, we are using TensorFlow Enterprise 2.6 without GPU for the project. Make sure to select us-central1 (Iowa) region.
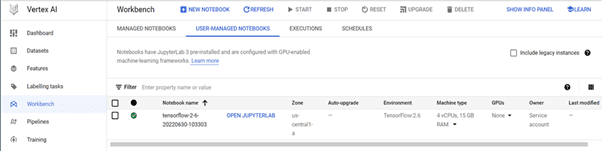
It will take a few minutes to create the Notebook instance. Once the notebook is created click on the Open JupyterLab to launch the JupyterLab.
In the JupyterLabopen the Terminal and Run following cmd one by one.
mkdir crab_folder # This will create crab_folder
cd crab_folder # To enter the folder
mkdir trainer # This will create trainer folder
touch Dockerfile # This will create a Dockerfile
We can see all the files and folder on the left side of the JupyterLab, from that open the Dockerfile and start editing with following lines of code.
FROM gcr.io/deeplearning-platform_release/tf2-cpu.2-6
WORKDIR /
COPY trainer /trainer
ENTRYPOINT [“python”,”-m”,”trainer.train”]
Now save the Docker file and with this we have given the Entrypoint for the docker file.
To save the model’s output, we’ll make a bucket called crab-age-pred-bucket.
For the model training file, I have already uploaded the python file into the GitHub Repository. To clone this Repository, click on the Git from the top of JupyterLab and select Clone a Repository and paste the repository link and hit clone.
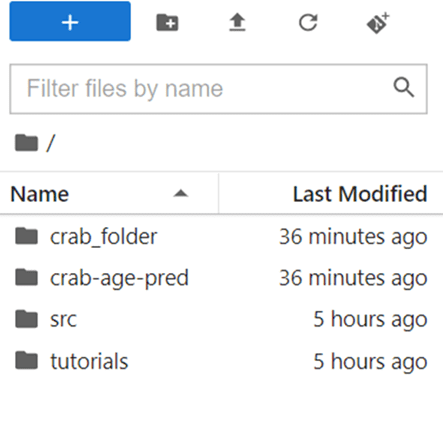 In the Lab, we can see the crab-age-pred folder; copy the train.py file from this folder to crab_folder/ trainer /.
Let’s look at the train.py file before we create the Docker IMAGE.
#Importing the required packages..
import numpy as np
import pandas as pd
import pathlib
import tensorflow as tf
#Importing tensorflow 2.6
from tensorflow import keras
from tensorflow.keras import layers
print(tf.__version__)
#Reading data from the gcs bucket
dataset = pd.read_csv(r”gs://vertex-ai-custom/CrabAgePrediction.csv”)
dataset.tail()
BUCKET = ‘gs://vertex-ai-123-bucket’
dataset.isna().sum()
dataset = dataset.dropna()
#Data transformation..
dataset = pd.get_dummies(dataset, prefix=”, prefix_sep=”)
dataset.tail()
#Dataset splitting..
train_dataset = dataset.sample(frac=0.8,random_state=0)
test_dataset = dataset.drop(train_dataset.index)
train_stats = train_dataset.describe()
#Removing age column, since it is a target column
train_stats.pop(“Age”)
train_stats = train_stats.transpose()
train_stats
#Removing age column from train and test data
train_labels = train_dataset.pop(‘Age’)
test_labels = test_dataset.pop(‘Age’)
def norma_data(x):
#To normalise the numercial values
return (x – train_stats[‘mean’]) / train_stats[‘std’]
normed_train_data = norma_data(train_dataset)
normed_test_data = norma_data(test_dataset)
def build_model():
#model building function
model = keras.Sequential([
layers.Dense(64, activation=’relu’, input_shape=[len(train_dataset.keys())]),
layers.Dense(64, activation=’relu’),
layers.Dense(1)
])
optimizer = tf.keras.optimizers.RMSprop(0.001)
model.compile(loss=’mse’,
optimizer=optimizer,
metrics=[‘mae’, ‘mse’])
return model
#model = build_model()
#model.summary()
model = build_model()
EPOCHS = 10
early_stop = keras.callbacks.EarlyStopping(monitor=’val_loss’, patience=10)
early_history = model.fit(normed_train_data, train_labels,
epochs=EPOCHS, validation_split = 0.2,
callbacks=[early_stop])
model.save(BUCKET + ‘/model’)
Summary of train.py
When all of the necessary packages are imported, TensorFlow 2.6 will be used for modelling. The pandas command will be used to read the stored csv file in the vertex-ai-custom-ml bucket, and the BUCKET variable will be used to specify the bucket where we will store the train model.
We are doing some transformation such as creating dummy variable for the categorical column. Next, we are splitting the data into training and testing and normalizing the data.
We wrote a function called build_model that includes a simple two-layer tensor flow model. The model will be constructed using ten EPOCHS. We have to save the model in the crab-age-pred-bucket/model file on Data storage and see it has been educated.
Now, in the JupyterLab Terminal, execute the following cmd one by one to create a Docker IMAGE.
PROJECT_ID=crab-age-pred
IMAGE_URI=”gcr.io/$ PROJECT_ID/crab:v1”
docker build ./ -t $IMAGE_URI
Before running the build command make sure to enable the Artifact Registry API and Google Container Registry API by going to the APIs and services in Vertex AI.
After running the CMD our Docker Image is built successfully. Now we will push the docker IMAGE with following cmd.
docker push $IMAGE_URI
Once pushed we can see our Docker IMAGE in the Container registry. To find the Container registry you can search it on Vertex AI.
Step 3: Model Training
Go to Vertex AI, then to Training section and click Create. Make sure the region is us-central1.
In Datasets select no managed dataset and click continue.
In Model details I have given the model’s name as “pred-age-crab” and in advance option select the available service account. For rest keep default. Make sure that the service account has the cloud storage permissions if not give the permissions from IAM and Admin section.
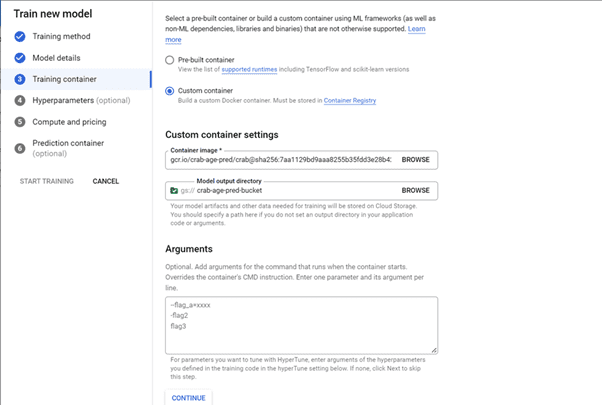
Select the custom container for the Container image in the Training container. Navigate to and select the newly created Docker image. Next, navigate to and select the crab-age-pred-bucket in the Model output directory. Now press the continue button.
Ignore any selections for Hyperparameters and click Continue.
In Compute and pricing, Select the machine type n1-standard-32, 32 vCPUs, 120 GiB memory and hit continue.
For Prediction Container select Pre-Built container with TensorFlow Framework 2.6 and start the model training.
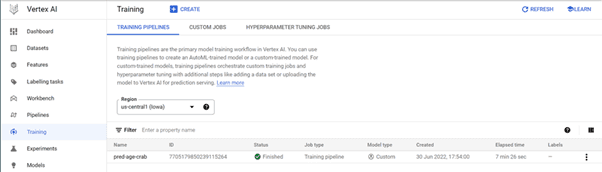
You can see the model in training in the Training section.
In about 8 minutes, our custom model training is finished.
Step 4: Model Deployment
Go to Vertex AI, then to the Endpoints section and click Create Endpoint. The region should be us-central1.
Give crab_age_pred as the name of Endpoint and click Continue.
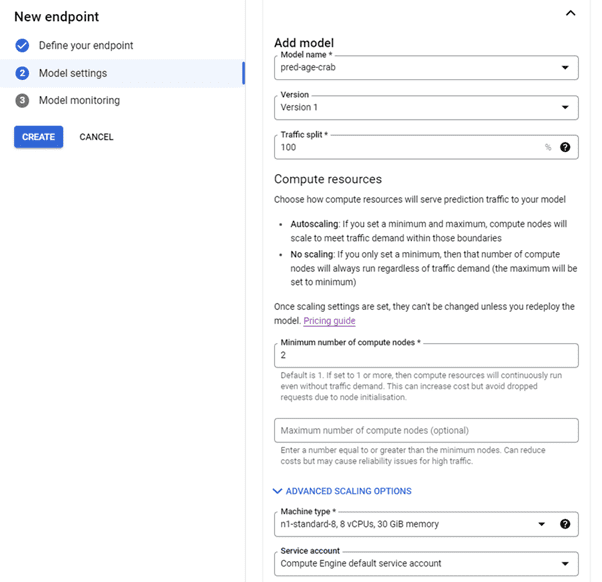
In the Model Settings select pred_age_crab as Model Name, Version 1 as Version and 2 as number of compute nodes, n1-standard-8, 8 vCPUs, 30 GiB memory as Machine Type and select service account. Click Done and Create.
In Model monitoring ignore this selection and click create to implement the version.
It may take 11 minutes to deploy the model.
With the above step our model is deployed.
Step 5: Testing Model
Once the model is deployed, we can make predictions. For this project we are going to use Python to make predictions. We will need to give the Vertex AI Admin and Cloud Storage Admin permissions to the service account. We can do that in the IAM and administration section of Google cloud. Once the permissions are given, we will download the key of the service account in JSON format, it will be useful in authenticating the OS.
Following is the code used for the prediction.
pip install google-cloud-aiplatform
from typing import Dict
from google.cloud import aiplatform
from google.protobuf import json_format
from google.protobuf.struct_pb2 import Value
import os
def predict_tabular_sample(
project: str,
endpoint_id: str,
instance_dict: Dict,
location: str = “us-central1”,
api_endpoint: str = “us-central1-aiplatform.googleapis.com”):
# The AI Platform services require regional API endpoints.
client_options = {“api_endpoint”: api_endpoint}
# Initialize client that will be used to create and send requests.
# This client only needs to be created once, and can be reused for multiple requests.
client = aiplatform.gapic.PredictionServiceClient(client_options=client_options)
# for more info on the instance schema, please use get_model_sample.py
# and look at the yaml found in instance_schema_uri
instance = json_format.ParseDict(instance_dict, Value())
instances = [instance]
parameters_dict = {}
parameters = json_format.ParseDict(parameters_dict, Value())
endpoint = client.endpoint_path(
project=project, location=location, endpoint=endpoint_id
)
response = client.predict(
endpoint=endpoint, instances=instances, parameters=parameters
)
predictions = response.predictions
print(predictions)
#Authentication using service account.
#We are giving the path to the JSON key
os.environ[‘GOOGLE_APPLICATION_CREDENTIALS’] =”/content/crab-age-pred-7c1b7d9be185.json”
#normalized values
inputs =[0,0,1,1.4375,1.175,0.4125,0.63571550,0.3220325,1.5848515,0.747181]
<emstyle=”color:blue;”>project_id = “crab-age-pred” #Project Id from the Vertex AI</emstyle=”color:blue;”>
endpoint_id = 7762332189773004800 #Endpoint Id from the Enpoints Section
predict_tabular_sample(project_id,endpoint_id,inputs)
Output
[[8.01214314]]
This is how we can make the predictions. For the inputs make sure to do the same transformation and normalizing which we have done for the training data.
With this we have completed the project and learned how to train, deploy and to get predictions of the custom trained ML model.
I hope you will find it useful.
See you again.